Electrical safety in rental properties is a legal responsibility and a critical safety measure. Faulty electrical systems are a leading cause of residential fires, with over 24,200 incidents reported in 2021, causing $1.2 billion in damages. This guide explains how landlords can conduct basic visual inspections to identify potential risks while leaving technical repairs to licensed electricians. Key points include:
- Legal Requirements: Florida law mandates 24-hour notice before inspections and requires landlords to maintain safe electrical systems.
- Inspection Checklist: Focus on main panels, outlets, switches, GFCI protection, lighting fixtures, and exterior circuits.
- When to Call a Professional: Issues like burning odors, outdated wiring, or frequent breaker trips need expert attention.
- Tools Needed: Outlet testers, flashlights, and inspection checklists are essential for a thorough walkthrough.
- Maintenance Schedule: Monthly, quarterly, and annual checks ensure compliance and prevent hazards.
Neglecting these responsibilities can lead to legal disputes, tenant complaints, or severe property damage. Regular inspections, proper documentation, and professional property management assistance are essential for maintaining safety and compliance.
Legal and Safety Basics for Electrical Inspections
Before conducting an electrical inspection on a rental unit, it’s crucial to familiarize yourself with the relevant legal guidelines. These rules not only ensure a thorough inspection but also help protect both your tenants and your property.
Florida Laws on Landlord Access and Inspections
Florida law requires landlords to provide at least 24 hours’ notice to tenants before entering a unit for repairs or inspections, as outlined in Florida Statute §83.53. Inspections and repairs must take place between 7:30 a.m. and 8:00 p.m.. The only exception is an emergency, such as a live electrical hazard or a fire risk, where immediate access is necessary to safeguard the property and its occupants.
"The landlord may enter the dwelling unit upon reasonable notice to the tenant and at a reasonable time for the purpose of repair of the premises. ‘Reasonable notice’ for the purpose of repair is notice given at least 24 hours prior to the entry." – Florida Statute 83.53
In Jacksonville, HB 1417 takes precedence over stricter local tenant-notice rules, ensuring statewide consistency.
Once access is secured, landlords must ensure they meet their legal responsibilities for maintaining a safe property.
What Landlords Are and Are Not Responsible For
Under Florida law, landlords are required to keep rental units safe and compliant with building codes throughout the lease term. Electrical hazards like exposed wiring or malfunctioning outlets violate the implied warranty of habitability. If a tenant submits a written report of an electrical issue, the landlord has seven days to address the problem before the tenant can pursue legal action.
Here’s a quick overview of landlord responsibilities for common electrical issues:
| Electrical Item | Landlord Responsible? |
|---|---|
| Exposed or faulty wiring | Yes – must repair |
| Electrical service interruption | Prohibited from causing it |
| Light fixtures (if included in lease) | Yes |
| Light bulb replacement | No |
| Smoke detector installation (move-in) | Yes – for single-family/duplex units |
| Damage caused by tenant negligence | No |
It’s important to note that landlords are prohibited from cutting off or interrupting a tenant’s electrical service, either directly or indirectly. Violating this rule can result in liability for the greater of actual damages or three months’ rent, plus attorney’s fees.
Once you’ve reviewed your obligations, it’s time to determine when professional help is necessary.
When to Call a Licensed Electrician
While landlords can handle basic visual inspections, certain electrical issues require the expertise of a licensed electrician. You should contact a professional if you encounter:
- Circuit breakers tripping more than twice within six months
- Burning odors, warm switch plates, or flickering lights
- Evidence of arcing, overheating, or "double tapping" in the main electrical panel
- Federal Pacific (FPE) or Zinsco panels, which fail to trip during overcurrent events in 25% of cases
- Outdated systems like aluminum wiring from the 1960s or knob-and-tube wiring from the 1940s, often found in historic neighborhoods like San Marco and Riverside in Jacksonville
With updates to the National Electrical Code (NEC) set to take effect in 2026, landlords in Northeast Florida will need to comply with expanded surge protection and stricter AFCI requirements. Hiring a professional for an electrical inspection in Jacksonville typically costs between $200 and $500, depending on the property’s size and the complexity of its wiring. This expense is small compared to the potential costs of a fire or legal dispute.
sbb-itb-73b3b1a
How to Prepare for an Electrical Walkthrough
Good preparation is key to a thorough and efficient walkthrough. With the right tools and proper documentation, you can identify more issues, stay organized, and protect yourself legally in case of disputes. This step also helps maintain safety and compliance throughout your property management process.
Tools You Need for a Basic Electrical Inspection
You don’t need a ton of expensive equipment for a landlord-level inspection – just a few essentials will do the job.
| Tool | Purpose |
|---|---|
| UL-Approved Outlet Tester | Verifies proper wiring, grounding, and polarity in standard outlets |
| GFCI Tester | Ensures kitchen and bathroom outlets trip and reset correctly |
| Flashlight | Lights up dark spaces like panels, crawlspaces, and attics |
| Ladder | Provides access to high fixtures, smoke detectors, and attic spaces |
| Smartphone or Digital Camera | Takes timestamped photos to document issues |
| Inspection Checklist | Keeps the walkthrough systematic and thorough |
While advanced tools like thermal imaging cameras and multimeters can uncover hidden problems, these are best handled by licensed electricians. For a visual inspection, the basic tools above are all you need.
"Electrical preventive maintenance helps you catch small issues before they become emergencies." – United Field Services
Once you’ve gathered your tools, the next step is notifying tenants and organizing your paperwork.
Notifying Tenants and Setting Up Documentation
With your tools ready, focus on administrative tasks to ensure everything runs smoothly and legally.
Start by giving tenants at least 24 hours’ written notice before entering their unit. This not only fulfills legal requirements but also shows respect for their space. Plan inspections during low-traffic times – mid-morning on a weekday often works well. If the unit is vacant, inspections are even easier as you’ll have unrestricted access.
Invite tenants to be present during the walkthrough. Their involvement promotes transparency and allows you to address any concerns directly.
Before the inspection, gather past reports and repair records to identify recurring issues. As you go through the property, take clear, timestamped photos of every problem, no matter how minor. Keep detailed written notes in one place, whether you prefer a physical notebook or a digital file. This level of documentation is crucial – 85% of electrical code violations are identified during formal audits rather than through reactive fixes.
Step-by-Step Guide to Inspecting Electrical Systems
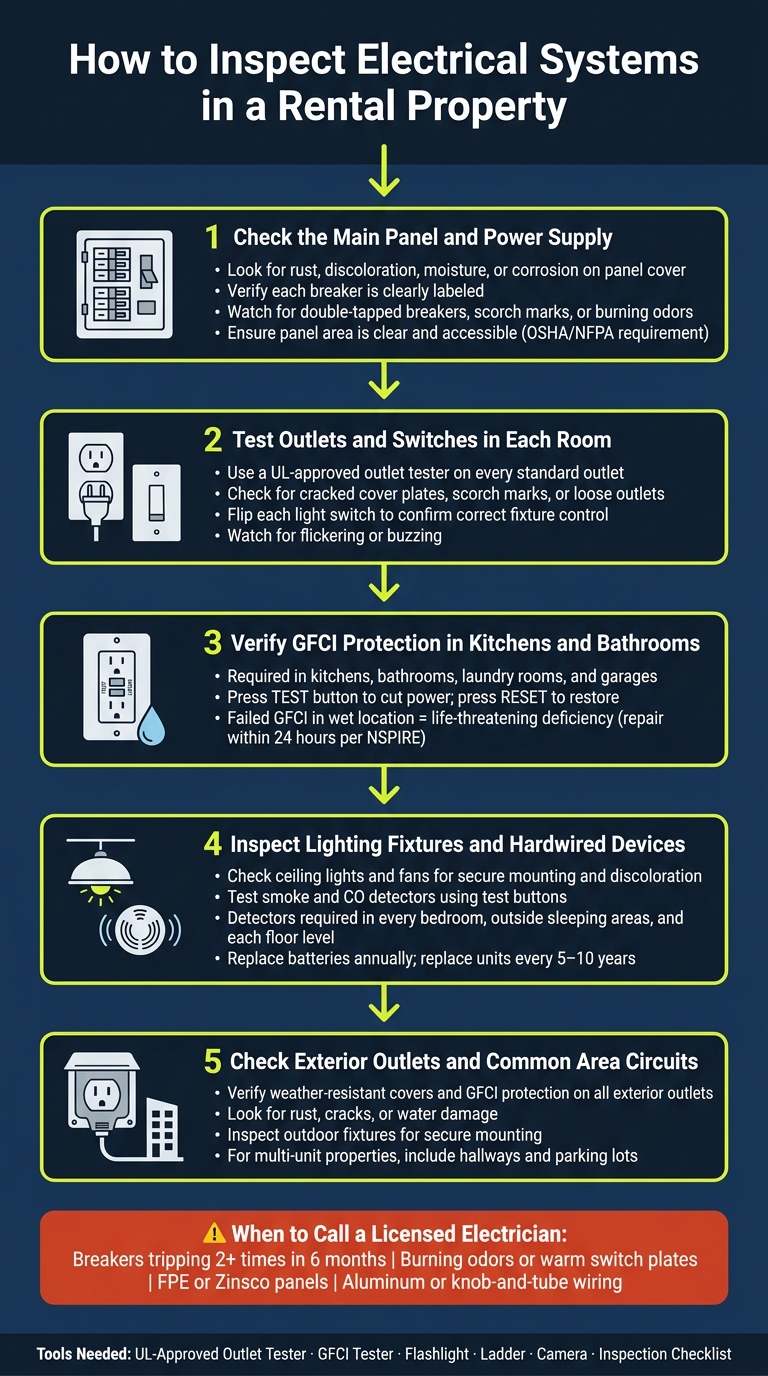
How to Inspect Electrical Systems in a Rental Property: 5-Step Guide
Once you have your tools and documentation ready, it’s time to systematically review the key components of the property’s electrical system. This process is essential for ensuring safety and compliance. Follow these five steps to cover all major areas.
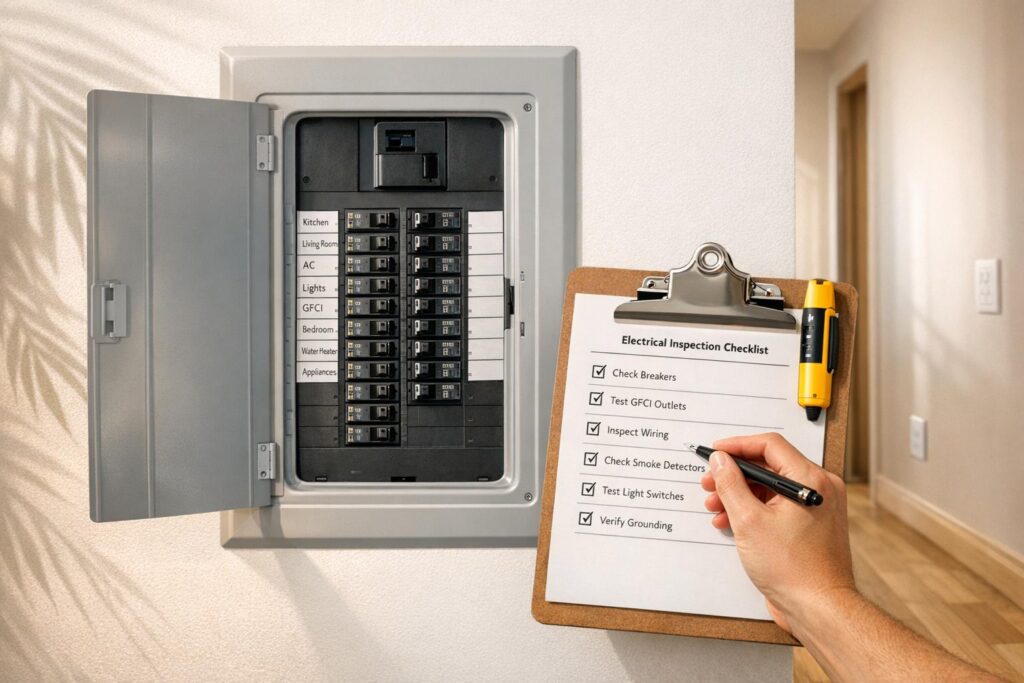
Step 1: Check the Main Panel and Power Supply
Begin with the electrical panel. Look for signs of rust, discoloration, moisture, or corrosion on the panel cover. Ensure the panel is flush, securely mounted, and easily accessible in case of emergencies.
Verify that each breaker is clearly labeled and accurately describes the circuit it controls. If you notice double-tapped breakers, scorch marks, burning odors, or hear buzzing sounds, contact a licensed electrician immediately. Missing or illegible labels are a frequent issue flagged during formal inspections.
Also, ensure the area in front of the panel is clear of any stored items. OSHA and NFPA standards require unobstructed working space around electrical equipment.
"A structured electrical inspection program reduces fire liability, eliminates compliance exposure, and protects building occupants from shock and arc flash hazards that develop silently in aging or unmonitored electrical systems." – Josh Turley, OxMaint
Once the panel is checked, proceed to test individual outlets and switches throughout the property.
Step 2: Test Outlets and Switches in Each Room
Using a UL-approved tester, inspect every standard outlet. Pay attention to the indicator lights, as they can reveal issues like wiring faults, missing grounds, or reversed polarity. Check for cracked cover plates, scorch marks, or looseness when plugging in devices – loose outlets may indicate internal mounting problems.
For light switches, flip each one to confirm it controls the correct fixture and operates without flickering or buzzing.
Step 3: Verify GFCI Protection in Kitchens and Bathrooms
GFCI outlets are required in areas near water, such as kitchens, bathrooms, laundry rooms, and garages. Test each GFCI outlet by pressing the TEST button to ensure it cuts power. Then press RESET to restore power.
Under NSPIRE standards, a failed GFCI outlet in a wet location is considered a life-threatening deficiency and must be repaired within 24 hours. This is particularly important in areas like Jacksonville, which experiences an average of 117 rainy days per year, increasing the risk of moisture-related electrical hazards.
Step 4: Inspect Lighting Fixtures and Hardwired Devices
Examine ceiling lights, fans, and other hardwired devices to ensure they are securely mounted and functioning properly. Look for any discoloration that might indicate overheating. Test smoke and carbon monoxide detectors by pressing their test buttons to confirm they work. Detectors should be installed in every bedroom, outside sleeping areas, and on each level of the home. Plan to replace batteries annually and replace the units themselves every 5 to 10 years. If you’re conducting this inspection during a tenant turnover, consider replacing the batteries as a precaution.
Wrap up this step with a thorough exterior inspection.
Step 5: Check Exterior Outlets and Common Area Circuits
Inspect all exterior outlets to ensure they have weather-resistant covers and functional GFCI protection. Look for signs of rust, cracks, or water damage. Check outdoor light fixtures to confirm they are securely mounted and operational. For multi-unit properties, include common areas like hallways and parking lots in your review. Maintaining common-area lighting is both a safety measure and a legal responsibility for landlords under Florida law. If you notice any damage to exterior outlets or lights – especially after a storm – flag them for immediate repair to prevent potential hazards.
Scheduling Inspections and Handling Repairs
How Often to Schedule Electrical Inspections
Sticking to a regular inspection schedule is key to catching small electrical issues before they become bigger problems. For rental properties in Florida, here’s a general timeline to follow:
| Frequency | Tasks to Complete |
|---|---|
| Monthly | Test smoke/CO detectors, check GFCI outlets, and inspect exterior lighting visually. |
| Quarterly or Semi-Annually | Walk through the property to check outlets, switches, and the panel area. |
| Annually | Replace detector batteries and have a professional inspect the electrical panel. |
| Every 3–5 Years | Schedule a full electrical safety audit with a licensed electrician. |
| Tenant Turnover | Inspect all outlets, fixtures, and appliances before new tenants move in. |
"I always suggest property owners and managers to schedule an inspection every three to six months." – Chris Barnard, Licensed Building Inspector, Florida Commercial Building Inspectors
If your property was built before 1975, don’t stretch professional audits to five-year intervals. Older wiring systems weren’t designed to handle the demands of modern appliances, which increases the risk of electrical failures. Additionally, after major storms, it’s wise to inspect exterior outlets, the main electrical panel, and areas prone to moisture damage immediately.
Many Florida insurance companies also require a 4-Point Inspection for properties over 20 years old. This inspection covers electrical systems, plumbing, HVAC, and roofing and is often necessary for obtaining or renewing insurance. Staying on top of your inspection schedule can make this process smoother.
Once you’ve established your inspection routine, be diligent about documenting and addressing any issues that arise.
How to Log and Prioritize Repairs
A well-organized system for logging and prioritizing repairs is essential after inspections. For each inspection, document the following details: date, property address, unit number, inspector’s name, findings, and any photos. When repairs are completed, record the vendor’s information, repair date, parts used, and keep the invoice. This type of record-keeping not only helps with liability concerns but also simplifies insurance claims if issues arise later.
Immediate safety risks should always take top priority. For instance, address problems like burning smells, warm outlets, or sparking right away. Minor issues, such as loose cover plates or a malfunctioning exterior light, can be scheduled for repair within a reasonable timeframe.
If your property has FPE Stab-Lok or Zinsco panels – commonly installed before 1990 – flag them for a professional evaluation, as these panels are known for reliability concerns.
For landlords managing multiple properties, tracking repairs manually can become overwhelming. Using digital tools like property management software or a maintenance log can help you stay organized and ensure no recurring issues are overlooked.
How a Property Management Company Can Help
Keeping track of inspection schedules, coordinating with electricians, and maintaining proper documentation can be a lot to handle. This is where a property management company can provide substantial support.
For example, companies like 1 Realty Management, based in Jacksonville, Florida, take care of the operational side of property maintenance. They handle tasks such as scheduling regular inspections, working with licensed electricians, and maintaining detailed records that comply with Florida’s documentation standards. Whether you own a single-family home, a multi-family property, or an entire apartment complex, they ensure everything runs smoothly, giving landlords peace of mind and more time to focus on other priorities.
Conclusion: Keeping Your Rental Safe and Up to Code
Electrical safety in rental properties isn’t something you can check off once and forget about – it’s an ongoing responsibility. Florida’s humid weather, frequent storms, and older housing stock make regular inspections especially important. Nationwide, electrical failures are responsible for 46,700 to 51,000 home fires every year, causing more than $1.5 billion in direct property damage annually. Taking a proactive approach is always cheaper – both financially and in terms of risk – than dealing with the aftermath of a fire or injury.
Florida law is clear on this: under the implied warranty of habitability, landlords are required to maintain safe and functional electrical systems. This includes wiring, outlets, panels, and fixtures. These are your responsibilities as a landlord – not your tenant’s. Neglecting these obligations can lead to serious consequences, from rent withholding to lease terminations or even legal action.
"Meeting landlord electrical safety obligations protects your tenants and shields you from liability." – InstaElectricians
To stay compliant, two things are non-negotiable: documentation and licensed professionals. Keep a complete record of inspections, repairs, and any tenant complaints. Attempting DIY fixes on structural wiring or electrical panels is not just risky – it’s illegal in Florida. State law mandates that all electrical work in rental properties be performed by a licensed contractor. Hiring professionals for inspections and repairs isn’t just about compliance; it’s an investment in safety. Plus, passing an inspection can lower your annual insurance premiums by 10% to 15%.
FAQs
What electrical checks can I legally do myself as a landlord?
As a landlord, there are simple steps you can take to spot potential safety issues. Start by testing smoke and carbon monoxide detectors using their built-in test buttons, and make sure they haven’t passed their expiration dates. For GFCI outlets, press the test and reset buttons to confirm they’re functioning properly. During inspections, keep an eye out for problems like cracked faceplates, frayed cords, loose switches, or even signs of rust in the electrical panel.
However, when it comes to more complex tasks like wiring inspections, breaker testing, or any technical repairs, leave those to licensed professionals. Safety should always come first!
When is an electrical issue an emergency that allows entry without notice?
Under Florida law, landlords are allowed to access a rental property without prior notice during emergencies to safeguard the property. When it comes to electrical systems, this includes urgent situations such as the smell of burning, visible smoke, scorch marks on outlets, or buzzing and crackling sounds that could signal dangerous arcing. These problems present serious fire hazards, and immediate intervention is allowed to prevent potential damage or injury.
What should I document during an electrical inspection to protect myself?
Keeping thorough, audit-ready records is essential for protecting yourself. Make sure to document inspection dates, the tasks completed, and any corrective actions taken. This includes noting any licensed professionals you hired and the parts they used.
Track tenant complaints, your responses, and any related work orders. Photos or videos are also invaluable for capturing the property’s condition at any given time. For electrical panels, be sure to document details like the location, manufacturer, and amperage.
If there are safety issues – such as failed GFCI or AFCI tests – record the specifics, including the room and the circuit breaker involved. These steps can go a long way in ensuring you’re prepared for any audits or disputes.